
Foundation Intro to CSS
Basic Syntax
At the most basic level, CSS is made of various
rules. Theserulesare made of aselectorand a semicolon-separated list ofdeclarations, with each of those declarations being made up of aproperty-value pair.
Just like this: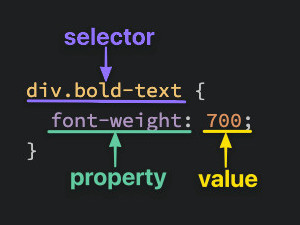
Selectors
Selectors refer to the HTML elements to which CSS rules apply.
Universal Selector
The universal selector will select elements of every type (as in the whole document)
1 | * { |
Type Selector
A Type selector (or element selector) will select all elements of the given element type, and the syntax is just the name of the element:
1 | <!-- index.html --> |
1 | /* styles.css */ |
Class Selectors
Class selectors will select all elements with the given class, which is just an attribute you place on an HTML element.
1 | <!-- index.html --> |
The syntax for class selectors: a period immediately followed by the case-sensitive value of the class attribute. Classes aren’t required to be specific to a particular element, and one element could have a few classes like this: class="alert-text severe-alert". Since white space is used to separate class names like this, you should never use spaces for multi-worded names and should use a hyphen instead.
1 | /* style.css */ |
ID Selectors
ID selectors are similar to class selectors. They select one element with the given ID, which is specific to one element. And one element can only have one ID.
1 | <!-- index.html --> |
We use a hashtag immediately followed by the case-sensitive value of the ID attribute.
1 | /* style.css */ |
The Grouping Selector
1 | .read, |
In this case, selector read and unread share the same declaration of color and background-color, but they could also have some unique declarations like that.
Chaining Selectors
See the following case:
1 | <div> |
1 | .subsection.header { |
What .subsection.header does is it selects any element that has both the subsection and header classes.
Descendant Combinator
Take look at this case:
1 | <!-- index.html --> |
1 | /* styles.css */ |
In this case, B and c will be selected.
Descendant Combination is to separate to class selector with space. This will select the element with the last class, and nested in an element with the first class, regardless of how deep that nesting is.
Properties to get started with
Color and Background-color
The color property sets an element’s text color, while background-color sets the background color of an element.
1 | p { |
Typography basics and text-align
font-familyfont-sizefont-weighttext-align: Aligning text horizontally within an element, and you can use the common keywords you may have come across in word processors as the value for this property
Image height and width
By default, an <img> element’s height and width values will be the same as the actual image file’s height and width. If you wanted to adjust the size of the image without causing it to lose its proportions, you would use a value of “auto” for the height property and adjust the width value.
1 | img { |
Adding CSS to HTML
External CSS
You could create a separate file for the CSS and linking it inside of an HTML’s opening and closing <head> tags with a void <link> element.
1 | <!-- index.html --> |
A couple of the pros to this method are:
- It keeps our HTML and CSS separated, which results in the HTML file being smaller and making things look cleaner.
- We only need to edit the CSS in One place, which is especially handy for websites with many pages that all share similar styles.
Internal CSS
Inside the opening and closing <head> tag, we could add the opening and closing <style> tag, and place all CSS rules inside it.
1 | <head> |
Inline CSS
Inline CSS makes it possible to add styles directly to HTML elements, though this method isn’t as recommended:
1 | <body> |
Here we don’t actually use any selectors here, since the styles are being added directly to the opening <div> tag itself. Then we have the style=... attribute, with its value within the pair of quotation marks being the declarations.
Note: Inline CSS will override the other two methods, which can cause unexpected results